Wednesday, February 26, 2014

Small Car Interface Board


EDIT July 7, 2014: The SC interface board does not eliminate the common P0461 - Fuel Level Sensor code.  The ECU requires variable voltage (e.g., low vs. high) and the SC interface board only sends constant volts.  This is a shame.  It will not eliminate all codes related to the conversion!

After several calls to Small Car, I have my interface board setup.  The legend they ship with the product has much to be desired, but Mao at SC was super helpful over the phone. So kudos to SC customer support.  ** My car is a 2001 Subaru Legacy and these mappings may not work for other models.

RMW Wiring Harness Wires Mapped to SC Code Eliminator Board


Subaru Wiring Harness wires set into the SC code eliminator board

Alternator Wiring Harness

Here's my Subaru/Vanagon alternator harness design.  The main RMW wiring harness does not include the ALT, starter, fuel pump, A/C compressor, voltage sensor or coolant level sensor!  So, I had to create my own sub-harness for these and figure out how to integrate them into the VW and main wiring harness.  This took a lot of brain cycles, hence my posting here to help others in the same predicament.

I am looking for a better way to do my wiring harness, in general, to make it a more turn-key install rather than two separate harnesses like this.  I'll keep you posted!

EDIT April 16, 2014: 
With the new decision to place my Subaru ECU in the rear passenger tail light, I can combine this sub-harness described here directly into the main Subaru harness.  What does this mean to my original design here?  For one, the fuel pump wire is shorter and directly connected to the ECU and their is no need to have the extra "pluggable" connectors since the wiring will be one main harness rather than the two.   Since it is now one, single harness, it all goes into the black box in a single location, so no need to mess with the extra black box grommet.

For more info, see my new solution here:  
subaru-ecu-placement-rear-passenger


A sub-harness is required when integrating a RMW wiring harness because it does not include these components

Tuesday, February 25, 2014

Need to wire this up... What pins are really required!?


Currently, I'm struggling with how to connect the least # of OBD2 wires from the engine bay of my van to the front, where I will have a diagnostics port available near the dash.  Paul Guzyk mentioned that a mechanic is going to want to plug in their favorite scan tool up front and drive around to diagnose a problem and that made perfect sense.  However, I don't want to run 7-8 OBD2 wires all the way up front, so I need to get only the ones I really care about out of these connectors!

Subaru pin-outs vs. OBD2Cables.com pin-outs

These are all 'front-facing' on the female connector.  Neither of the Subaru OBD2 connectors have pins in then 2,10, 6, or 14 positions.  These are the positions OBD2Cables.com uses for their shielded 'signal' wires.  They are shielded to prevent interference when transferring the codes, etc. to and from the ECU.

Also, curious as to why my 2001 Subaru has an extra pin (Violet/White wire in pin #9) that the 2003 Subaru connector does not.  I have no idea why.

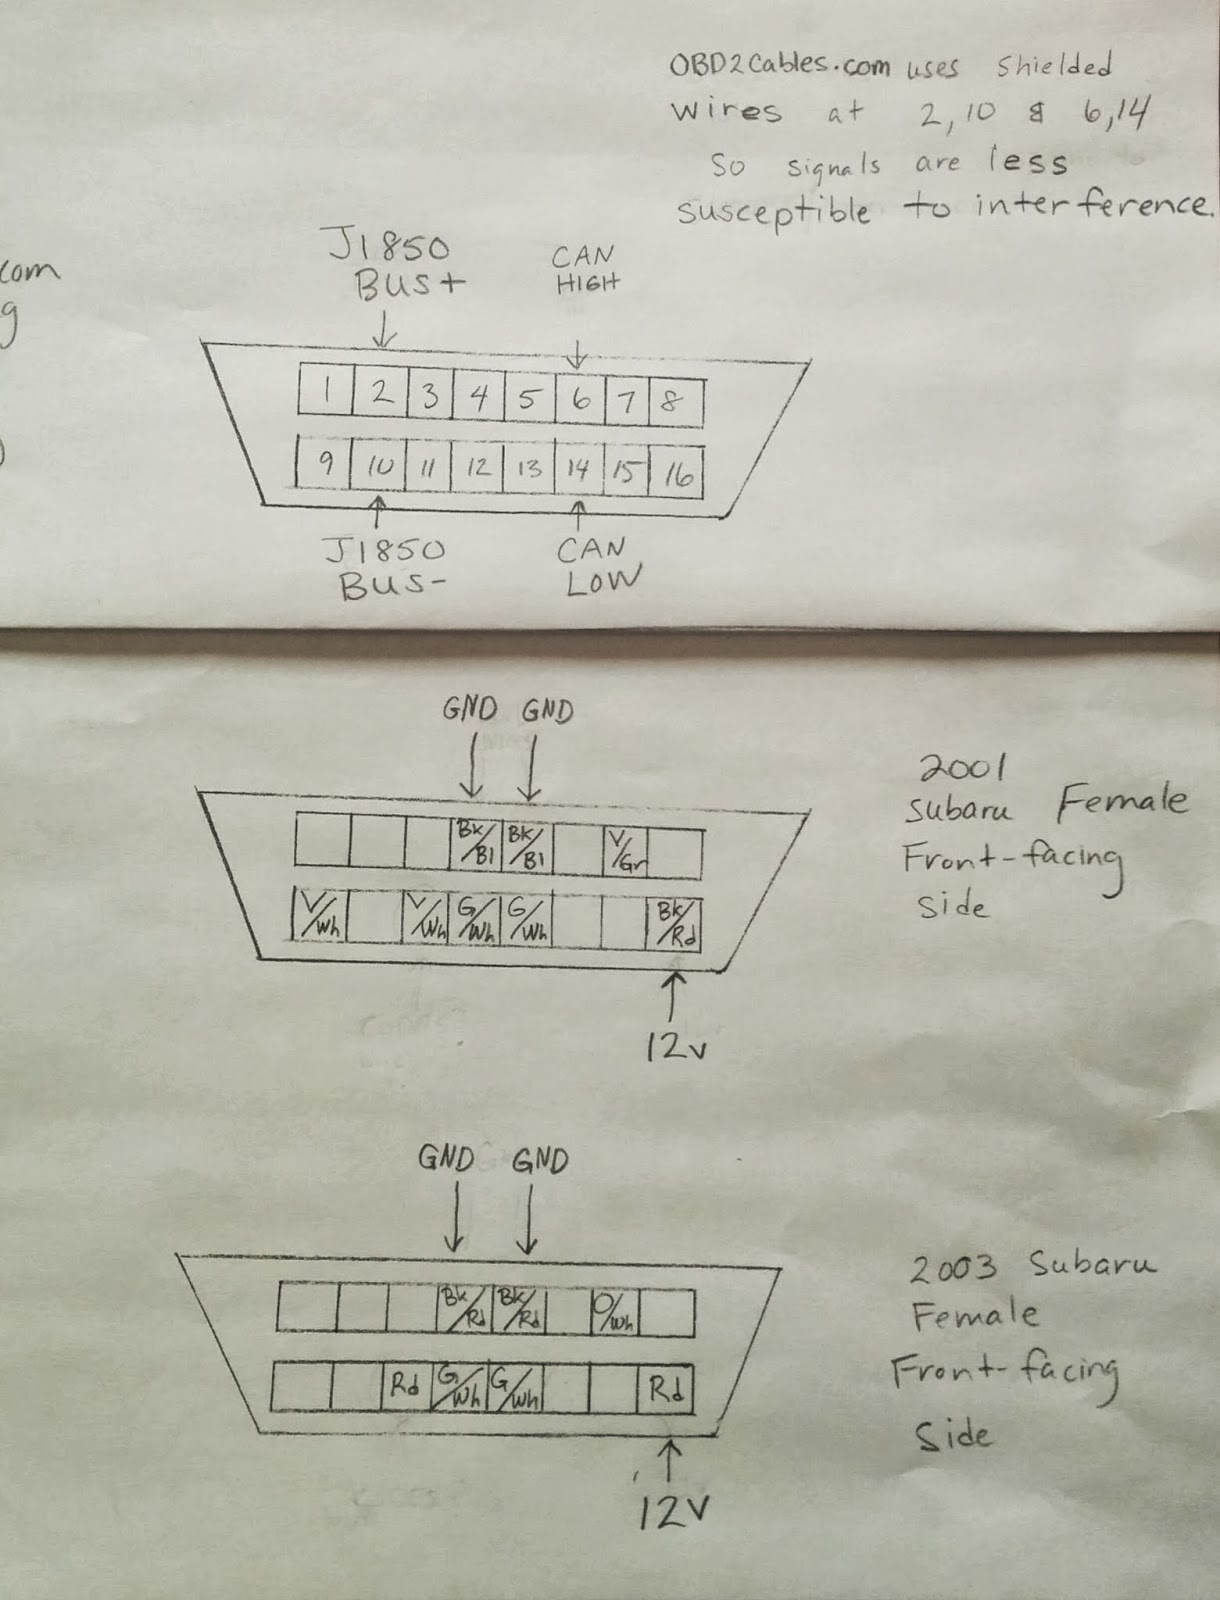
OBD2Cables.com vs. 2001 Subaru vs. 2003 Subaru


When comparing an online guide to Subaru pin-outs to my Subaru connectors, I see a big difference.  For instance, neither of my connectors have pin 6 or pin 15.  My Subaru connectors do have pin 7 (K-LINE) in common with the table, which might imply signals are sent over pin 7; however, this is not how OBD2Cables.com builds their cables (see above).  If it were so, OBD2Cables.com would have shielded wire for pin 7 as well.

UPDATE: April 16, 2014 - I chose 5, 7, and 16 based on this chart.  
Note:  Hans at Vanaru recomended also wiring up 4, which is a GND as well.


Sunday, February 23, 2014

Successful Trip to U-Pull & Pay !

The plug/connector on my van's coolant level sensor turned to dust (literally) when I pulled it out of the bottle during my conversion efforts.  I looked online and found new OEM replacement parts from a company in Canada called GermanSupply and some other import place...  They were both asking, I shit you not, $10 + $17 (shipping) = $27 total, for a part that is the size of my thumbnail!  So, I got on my coveralls and hit the trusty scrapyard where I pulled two plugs for a total of $4.  Good day I say!  These came from an '88 Jetta and an '85 Golf, but they still work with my '86 Vanagon :).

Now I have a spare too!

Things I did this weekend

Today was a productive day at the shop.
- Installed Rocky Mountain Westy Adapter Plate & Flywheel
- Installed new Sachs Clutch kit
- Installed new VW shift linkage to the transmission
- Removed old, rear drive axles
- Changed transmission fluid to new Redline MT-90.  Put in 3.7 qts and it never leaked out the fill-hole.  I stopped at that since Bentley manual says 3.2-3.7 qts.
- Worked through minor wiring harness question with my mentor, Paul.

Here are the highlight reel from the day's activities:

Metal shavings on the magnetic transmission drain plug.

Newly installed shift linkage

Axle missing from transmission side.

Axle missing from the wheel side.

Using a wrench to torque down flywheel bolts

And, finally!  Adapter plate, flywheel and clutch installed on the Subaru.


Saturday, February 22, 2014

Installed New Rear Axles - Made in CHINA :-/

My old axles were toast.  When removing them, I literally pulled some bolts out with my fingers!  I ended up ordering all new axle Italian-made (OEM-quality) CV bolts and serrated washers, and then ordered NEW (not rebuilt) Chinese axles from GoWesty.  They were cheaper than the German OEM rebuilds and according to GoWesty (who sells both), they are fine quality.  I kept my originals around in case I need to take them in to CVJ Axles (Denver, CO) to have them rebuilt at some point. :)

Chinese Made Axles from GoWesty arrived


Messy in there.  Gotta clean out that grime before re-installing

 
Transmission axle joint


Friday, February 7, 2014

Vanagon 2.1L Engine is OUT

This summer, I bought my California Vanagon on CraigsList "sight unseen", hopped a one-way flight to Burbank to go get it, and drove it home to Denver.  In a strange twist of fate, a Californian bought a Vanagon in Leadville "sight unseen", hopped a one-way flight to CO to get it, and drive it home to Cali.  His engine is damaged, so he is replacing it with mine to drive it back to Cali.  I know it will make the trip just fine as it did for me!!  :)  

My old VW engine will back to it's homeland soon...  Peace out.

My 2.1L waiting for a new home in an '87 Westy

Empty engine bay.  Lots of labels, so I know what to keep and remove for my Subaru swap!

Tutorial: How to crimp connectors, strip wire and use heat shrink.

Anyone doing a Subaru/Vanagon conversion themselves will surely be involved in some wire crimping at one point or another.  This video is great.  It discusses tools to wire strip, crimp, and heat shrink properly and a lot of techniques and gotchas to watch out for.


Wednesday, February 5, 2014

SmallCar shipped my order!!!

Psyched to be getting this shipment soon!  What is all this shit?
Well, Vanagons have the oil dipstick accessible from the back license plate, which is nice and easy to check without unloading all your gear in the back.  However, once you install a Subaru engine, this luxury is not available to you unless you buy an expensive, custom oil pan for about $300+ or you buy a SmallCar flexible dipstick for $80.  Luckily, my van has lifted springs, so I have enough ground clearance with the stock Subaru oil pan.  I picked up the flexible dipstick instead and hopefully it works as well as they claim.

An Interface Board is a "code eliminator".  The Vanagon has less sensors than the Subaru, so it doesn't have all the signals to send the Subaru ECU about its health.  This sends fake signals to my Subaru ECU to make it think everything is OK and therefore, not throw false "Check Engine Light" warnings constantly.  And, getting an upgraded tachometer and face that goes to 7K RPMs will be a better representation of the Subaru engine over the stock VW's 6K RPMs.


Tuesday, February 4, 2014

SubaruVanagon Alt Wiring Design

One of the toughest parts of this SubaruVanagon conversion has been the wiring.  The instructions and diagrams I've seen are hard to understand.  Today, I'm posting a photo I sent to RMW and the subsequent diagram I created to wrap my head around it better.  Hopefully, this will help others, who are in my same boat as well.

The main concern with the design shown in the photo & diagram attached is around the Bl/Rd voltage regulator sense wire.  RMW instructed me to wrap it around, crimp an eye-let on the end and connect it directly to the alternator as shown in the diagram and photo below.  However, I've been told by experts online at SubaruVanagon to connect to the B+ post via a 10 amp fuse in the black box.

Which way do I do it?  I need a tie-breaker!  LOL!!!

UPDATE (February 7) - Tie-breaker results are IN. 

Based on feedback from numerous folks that have done it this way and Paul, my mentor, who says "electrically they are the same result"...  I will implementing as designed here.

Photo of my alternator harness with RMW comments
How the photo translates in my head...